Creating Kanzi Studio command plugins
Kanzi Studio plugins extend the functionality of Kanzi Studio and run in Kanzi Studio. Use a Kanzi Studio plugin to:
- Automate tasks in Kanzi Studio. For example, to automate tasks that take a lot of time when you do them manually, or the task is prone to errors.
- Import and export content from Kanzi Studio. For example, to import or export localization tables in a format not supported by Kanzi Studio.
- Create editors that abstract the details and speed up the workflow. For example, to visualize the connections between nodes and resources used in your Kanzi Studio project.
You can present a Kanzi Studio plugin either in a Kanzi Studio window that contains the plugin user interface, or as a command that users can execute from the context menu and run the plugin without a user interface. This topic covers how to create Kanzi Studio command plugins. To learn how to create Kanzi Studio window plugins, see Creating Kanzi Studio window plugins.
Kanzi Studio plugin interface is provided as .NET framework assembly. You can find it in <KanziInstallation>/Studio/Bin/PluginInterface.dll. The plugin interface provides access to data and commands in Kanzi Studio. To develop a Kanzi Studio command plugin:
- Create the base for a Kanzi Studio plugin. See Creating the base for a Kanzi Studio command plugin.
- Build and run your Kanzi Studio plugin. See Building and running a Kanzi Studio plugin.
- Add functionality to your Kanzi Studio plugin. See Adding functionality to your Kanzi Studio command plugin.
- Debug your Kanzi Studio plugin. See Debugging a Kanzi Studio plugin.
To find detailed information about the Kanzi Studio plugin interface see:
Creating the base for a Kanzi Studio command plugin
Kanzi Studio command plugins are plugins that you execute as a single command and do not have a user interface. For example, use the command plugins to execute a command on the entire or the selected part of the scene graph in your project.Here you create the base for a Kanzi Studio command plugin where you then add functionality that extends the functionality of Kanzi Studio.
To create a Kanzi Studio command plugin:
- In Visual Studio select File > New > Project and create a Visual C# Class Library.

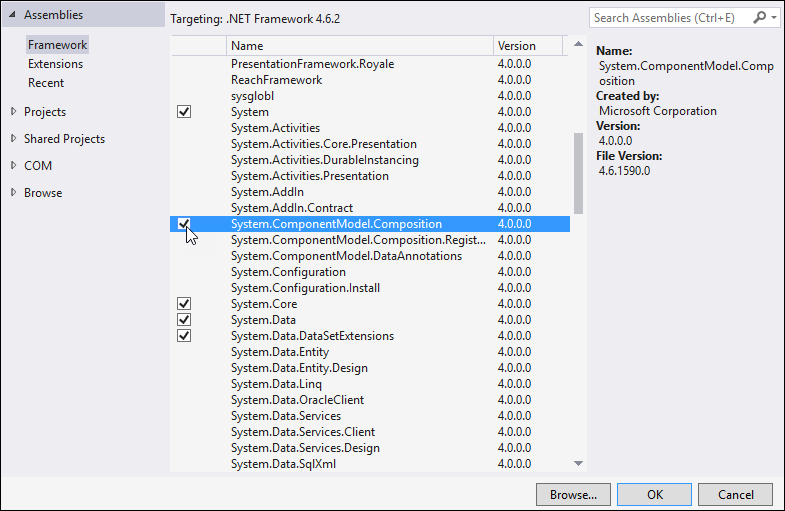
- In the Solution Explorer right-click the project name, select Add > Reference, and add references to files:
- Select Assemblies > Framework targeting .NET Framework and add the reference to:
System.ComponentModel.Composition.
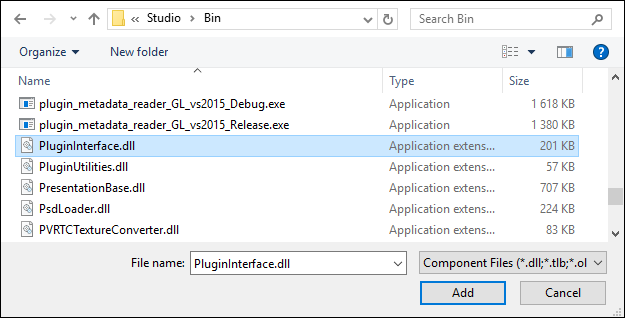
- Click Browse... and add the reference to the <KanziInstallation>/Studio/Bin/PluginInterface.dll file.
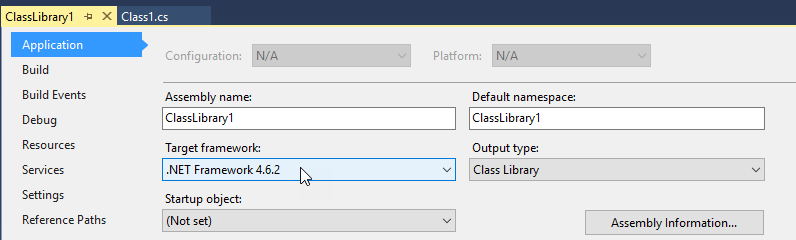
In the Solution Explorer right-click the project name, select Properties, and:
- In the Application tab set the Target framework to .NET Framework 4.6.2.
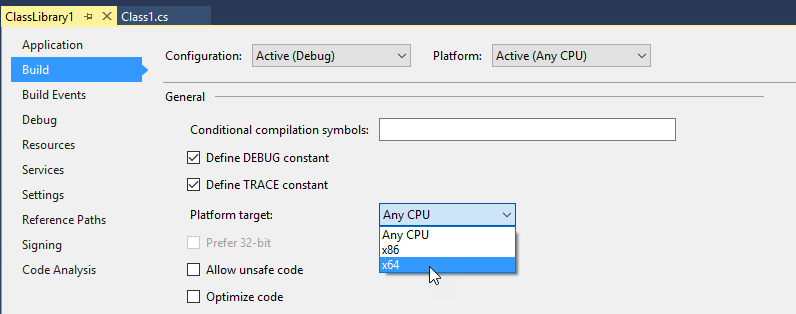
- In the Build tab set the Platform target to x64.
-
Open the
Class1.cs file and add the using directive for the System.ComponentModel.Composition and the Kanzi Studio plugin interface:
using System.ComponentModel.Composition;
using Rightware.Kanzi.Studio.PluginInterface;
- Before the definition of the command class where you implement the
PluginCommand interface, use the export attribute to tell Kanzi Studio that the .dll is a plugin. In this example, you implement the plugin in the Class1 class.
[Export(typeof(PluginContent))]
- Set the
Class1 class to implement the PluginCommand interface, which you implement in the Class1 class. Kanzi uses this class to create the plugin.- Change
public class Class1
to
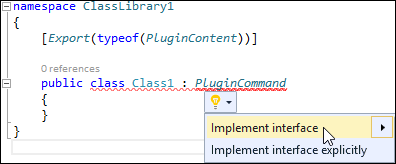
public class Class1 : PluginCommand
- Implement the
PluginCommand interface.
For example, hover over PluginCommand, click  , and select Implement Interface.
-
In all functions replace this line with the code you want to execute:
throw new NotImplementedException();
Make sure that your plugin handles all its internal exceptions and does not let them reach the Kanzi Studio interface.
For example, set the functions in the Class1 class to:-
Use the
CommandPlacement function to set the menu name of the plugin, and where you want to show the command to launch the plugin:
- To show the plugin in the main menu use
ContextMenuPlacement.NONE. - To show the plugin in the context menus invoked from nodes and resources, and the main menu use
ContextMenuPlacement.PROJECT_ITEM.
get
{
    return new CommandPlacement("myPluginMenu", ContextMenuPlacement.NONE, false, null);
} -
Use the
Description function to set a brief description of what your Kanzi Studio plugin does. Kanzi Studio shows this description as a tooltip when a user hovers the mouse pointer over the plugin name in the menu.
get
{
    return "A tooltip with short description of what the plugin does.";
} -
Use the
DisplayName function to show the plugin name in the Kanzi Studio menu where you can launch the plugin.
get
{
    return "Plugin display name";
} -
Use the
Name function to set the internal name of your plugin. Kanzi uses the internal name of the plugin so that you can change the display name of your plugin without additional changes to the plugin.
get
{
    return "Internal plugin name";
} -
Use the
CanExecute function to set whether users can launch your plugin, and where they can launch your plugin:
- When set to
false, Kanzi Studio shows the plugin in the main menu and the context menu, but users cannot launch the plugin. - When set to
true, users can launch the plugin.
Kanzi Studio provides the KanziStudio object to plugins. The KanziStudio object is the root object for data access and provides the current project, available commands, global undo and redo, and events related to project opening and closing.
For example, use this to enable the command only when a Kanzi Studio project is open
private KanziStudio studio;
public bool CanExecute(PluginCommandParameter parameter)
{
    return this.studio != null && this.studio.Project != null;
} - Add to the
Execute function the code you want your plugin to run.
For example, use this to print Hello world! to the Log window in Kanzi Studio when you run your plugin.
studio.Log("Hello world!"); -
Use the
Initialize function to place studio to a member variable.
public void Initialize(KanziStudio studio)
{
    this.studio = studio;
}
- Build and run the plugin. See Building and running a Kanzi Studio plugin.
Here you created just the base structure for your Kanzi Studio plugin, which only prints a message to the Kanzi Studio Log window. To make your plugin do more than that, add the code that you want your plugin to run to the Execute function. See Adding functionality to your Kanzi Studio command plugin.
To further develop your Kanzi Studio plugin, see Overview of Kanzi Studio plugin interface and Kanzi Studio plugin interface API reference.
Building and running a Kanzi Studio plugin
To build and run a Kanzi Studio plugin:
- In Visual Studio select Build > Build Solution to build the plugin .dll.

Copy the Kanzi Studio plugin .dll to the %ProgramData%\Rightware\<KanziVersion>\plugins directory.
If the plugins directory does not exist in %ProgramData%\Rightware\<KanziVersion>, create it.
- Open Kanzi Studio.
Kanzi Studio loads the plugins and adds them to either the main menu or the context menus invoked from nodes and resources. - In Kanzi Studio select the plugin main menu and select the plugin, or right-click a node in the Project and select the name of your plugin to run your plugin.
Adding functionality to your Kanzi Studio command plugin
Here you can find an example of a Kanzi Studio plugin. This plugin deletes all Empty Node nodes that do not have child nodes.
To delete Empty Node nodes without child nodes using a Kanzi Studio plugin:
- Create the base for your Kanzi Studio command plugin. See Creating the base for a Kanzi Studio command plugin.
- In Visual Studio open the Visual Studio solution of your plugin and open the class library file that implements the
PluginCommand interface. - In the
Execute function write the code that your plugin executes when you invoke the plugin command.
For example, to create a plugin that deletes all Empty Node nodes that do not have child nodes, add to Execute function:
// Plugin executes the content of this function. Place your plugin code here.
public void Execute(PluginCommandParameter parameter)
{
    var items = parameter.Items;
    // Print to the Kanzi Studio Log window.
    studio.Log("Deleting all Empty Node nodes without child nodes");

    // When executing from the main menu, items passes empty value as a parameter.
    // When executing from the context menu, items passes the selected items as a parameter
    // (even when multiple items are selected).
    if (items != null && items.Any())
    {
        // If executed from the context menu, start the function that traverses
        // the scene graph from the node where it is executed.
        TraverseTree(items);
    }
    else
    {
        // Check that a project is opened.
        if (studio != null && studio.Project != null && studio.Project.Screen != null)
        {
            // If executed from the main menu, starts the function that traverses
            // the scene graph from the first child of the Screen node.
            TraverseTree(studio.Project.Screen.Children);
        }
    }
}
// TraverseTree function traverses the scene graph from the node where you launch the plugin.
private void TraverseTree(IEnumerable<ProjectItem> items)
{
    foreach (var item in items.ToArray())
    {
        // If the node is an Empty Node 2D or Empty Node 3D and does not have
        // any child nodes, delete it.
        if ((item is EmptyNode2D || item is EmptyNode) && !item.Children.Any())
        {
            // Delete the project item using a command. This enables you
            // to undo the action performed by the plugin.
            studio.Commands.DeleteProjectItem(new ProjectItem[] { item });
        }
        // Traverse the children of the current node.
        else if (item.Children.Any())
        {
            TraverseTree(item.Children);
        }
    }
} - In the
CanExecute function set where and how you can launch the plugin in Kanzi Studio.
public bool CanExecute(PluginCommandParameter parameter)
{
    // Allow executing the plugin from the context menu only when a single node in the scene
    // graph is selected. Zero items are called when executing the plugin from the main menu,
    // which sets the plugin to start traversing the scene graph from the first child node of
    // the Screen node.
    var items = parameter.Items;
    return items != null && items.Count() <= 1;
} - In Kanzi Studio create a project that includes several Empty Node nodes, some that have child nodes, and some without child nodes.
- Build and run the plugin. See Building and running a Kanzi Studio plugin.
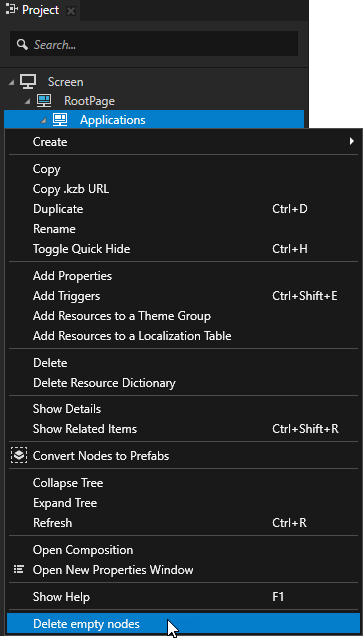
The plugin removes the Empty Node nodes which do not have any child nodes depending on where you run the plugin: - If you run the plugin from the main menu, the plugin removes the Empty Node nodes without child nodes in the entire project.

- If you right-click a node in the Project and run the plugin from the context menu, the plugin removes the Empty Node nodes without child nodes in the context of the selected node.
To further develop your Kanzi Studio plugin, see Overview of Kanzi Studio plugin interface and Kanzi Studio plugin interface API reference.
See also
Overview of Kanzi Studio plugin interface
Kanzi Studio plugin interface API reference
Creating Kanzi Studio window plugins
Installing Kanzi Studio plugins
Debugging Kanzi Studio plugins
Kanzi Studio plugins

Open topic with navigation